Showing posts with label how-to. Show all posts

Tuesday, January 8, 2013

Etsy banner tips

Your Etsy shop banner is the first thing a potential buyer will see. So, it must be attractive and inform clients about your shop. I would like to share with you a few of my favorite banners on Etsy as well as some good advice about how to create a good banner:

1. It’s important to give viewers a good idea of what they’ll find in your shop (you may want to insert  some pictures of your products in your banner; don’t forget about specific colors and forms related to your item listings)


2. Use your banner to inform about your shop and products (add a short tag line).


3. Use your banner to inform about promotions, sales or even about your holidays.


4. Crop a photo to the correct banner size (Etsy measures: 760 x 100 pixels).


5. I suggest your banner and your avatar (small profile picture) should have the same colors and/or forms.

How to make an Etsy banner?  

Therefore, to create a great banner, you have a couple of options:

Getting a Banner from an Etsy Seller
There are a lot of talented graphic designers on Etsy and you may purchase a banner from one of them (nice banners will run you $5 - $35). If you want to find them try searching “Etsy shop banner”.

Create a banner by yourself
To make your banner the right size and add text, you will need to use some graphic editing software as:

There's a really nice video tutorial about how to make a banner on Etsy using Gimp (by Create Hype).


Ula Phelep

The article in Polish is HERE

Friday, December 30, 2011

NEW YEAR, NEW YEAR!

New year is the time for celebration and resolutions but for a business owner it's also time for analyzing the profits and losses for the past year and planning for the future growth. This post should help you prepare for the tax season and get your planning off to a good start.
New Year's Eve Baby in Belly by FeelingArtsy

1. Get your records in order

If you have an accountant, just ask them for advice. But for every solo business owner, whether you've been plugging in every receipt in Excel or Quickbooks all year long or just kept stashing them in your purse, desk etc, now is the time to get them all recorded and filed away. 

If you've been "bad", this may be a daunting task but you need to just get on with it and do it. It may also be something to plan for next year - get that fresh spreadsheet going while updating the old one and plug in the receipts as you get them in the future. 
Hand Painted Box by InkPaintFunnyPicture
Keeping all of your receipts is important.  If you ever get audited by the IRS or your local government, they'll want to see them. I keep mine in several files labeled: post office, supplies, office supplies, meals & travel, promotion and other. I plug them in the computer about twice a week and file to the back by dates. But any kind of organization will work.

It is also helpful to keep separate bank accounts for your business and personal affairs. If you don't have one, here's another thing to put on your to do list for January.
2. Evaluate last year

During this evaluation you should evaluate your financial position as well as your past goals.


The financial documents you want to generate and evaluate are the balance sheet, the income statement and the cash flow statement. Quickbooks will do it for you and if you're very small like myself and using Excel a couple formulas will help you figure out the things that the 3 fancy accounting reports show: where you're standing financially, if you were profitable and how much funds you have on hand. 
Gift Certificate by Mage Studio


If you do plan to get bigger though (and which entrepreneur doesn't?!) you will have to get familiar with those financial documents and how to analyze them. If you find yourself too "artsy" for that or not all that great at math, you may want to consider hiring an account. It's important to have a clear understanding whether you're at least making it even. 

Once you know where your business is standing financially, you should take the time to figure out how it got here. Pull out your business plan or a little notebook with goals in my case that you created a year ago and review how you did. Make notes as you go about both: successful and unsuccessful results. They'll help you in the next step.


Custom Etsy Shop Banner by Magnesina


3. Plan for the new year

I usually start this step with getting a new notebook. Go back check your notes, look at past successes and failures and start planning for the new year. Set new goals - you could be going for a certain $ amount or maybe a number of sales per day, week, month, etc. Create action plan on how you're going to get there, e.g., you may want to make new items, make more items, add a new product line, redo pictures, redo tags and banners in your store, maybe start doing craft shows next year or advertising in a new way, etc. And finally get going and put it all in motion!


Paris Printable Calendar by BialaKura
Good luck to you, your business and Happy New Year!!!


Wednesday, November 30, 2011

3 Fixes To An Unproductive Week

Another unsatisfying day is turning into an unproductive week. You're probably tired of being in this rut? But finding a fix can prove difficult in the middle of a busy week. And it is especially important now during the super busy holiday season.

Crochet Hat by Danfe
Below are three symptoms of a bad week, and three tips for turning it around:

1) You had a poor plan or no plan – You choose to go through your day without a plan, instead jumping from one pop-up task to another “Whack-a-Mole” style.
 *The Fix: Spend 15 minutes each Sunday and spend 5 minutes each morning with your planner, calendar, sticky notes or dry erase board, preparing a task list and schedule that cover your important activities e.g. "prepare packages and go to the post office", "inventory and organize new supplies", "pay my etsy bill" and so on.
Bookmark by cacheedanslafloret

2) You had unrealistic expectations – The to-do list in your is just too darn big, an “everything but the kitchen sink” list and you fell short because a) there wasn’t enough time, or b) the timing was wrong.
*The Fix: Estimate the time of each task you want to accomplish and compare it to the time slots you see available in your planner or add specific start and finish times to each of the items on your list. What doesn’t fit must be delegated or pushed to another day. A successful to-do list gets completely checked off. Strive for this victory each day.


2012 calendar by JoannasPhoto


3) You got distracted: Whether it’s a sudden urge to see what's on the tv, somebody trying to skype with you,  browsing thru treasuries and other sellers that turns into hours or messing about on Facebook, all distractions lead you away from what truly needs to get done.
*The Fix: Say “no” to skype requests, don't surf the net for more than 20 minutes at a time, and stay disciplined to follow your daily priorities. Your plan is a personal commitment, so don’t let yourself down.
Cat Wall Organizer by Anka

A final word of advice – You expect slow traffic on snowy days, right? So make sure you plan your day for the delays, tangents, and detours life throws at you. Leave time each day for the unexpected and a little extra time for yourself. Give yourself a little breathing room each day. Remember: it's ok to schedule 30 more minutes for lunch and spend that time skyping, watching tv or going for a walk.


Feeling Artsy

Sunday, October 30, 2011

The 2 Secrets of Making a TO-DO List You'll Get Done

You’re tired of looking at a task list you never seem to get anywhere with. In fact, you might not be making a list at all anymore. Does it sound familiar?
Did you know there’s a difference between the to-do list you typically make and the type of list used by people who get things done?
Calendar by Magnesina
Here’s the secret to making a to-do list that really works: Make it specific, and make it fit.
What do I mean by this? Follow these steps and you’ll see:

Make it specific

 The most vital part of writing a good to-do list lies in the names of the tasks themselves. If they’re not specific, you’ll likely find yourself avoiding the work.
Try these tips for creating specific tasks:
-   Make certain that each task on your list offers specific detailed instructions. 
-   Don’t just write single words like “Etsy” on your list. That’s a large, unapproachable word that looks difficult to accomplish.
-   Create tasks that begin with a verb and offer clarity as to the subject, like ”Relist 3 items in my Etsy store,” or “Change tags from September to October”
-   If your task can’t be turned into a specific action, it needs to be broken down into smaller steps, as I did in the two examples above.
Notebooks by BialaKura
Make it fit

This too is a crucial part of your daily list. You need to stop making that giant “laundry list” of tasks that you’ll never get started and frankly have no intention of doing.

Ensure that your list fits into your day, by following these steps:
-   Plan your time conservatively, leaving room for the unexpected events that pop-up.
-   Always consult your schedule because your available task time periods often varies.
-   Limit yourself to 3-5 priority tasks each day
-   Write-down task times after each task, rounded off to the nearest 15 minutes.
-   Estimate times of day when tasks can be accomplished.
-   Group similarly planned tasks together – such as going to the post office and shopping.
-   If you find yourself having extra time and everything done – that’s a good problem! Grab a new task off your Master List or your Someday List.
Journal by AtelierRetro
There’s no better feeling than when you reach the end of the day holding a completely crossed-off, checked-off, worn out list. You’ve met your goals for the day and it’s time to celebrate. Follow these steps and set yourself up for success every day with a to-do list that provides a descriptive, realistic plan. Enjoy your time and good luck!

Tuesday, December 14, 2010

HOW TO Edit Background in Photoshop by Kapelusznik

It's Tuesday and I'm happy to introduce you next part of our 'how-to' series. This time kapelusznik made a tutorial, how to edit photo in photoshop to change background. This part is in polish, but we will translate it into english as soon as possible.

Edycja tła na zdjęciu, na którym jest człowiek (Photoshop)

Najważniejsza jest ostrość, wszystko inne można łatwo edytować. Na warsztat bierzemy zrobione na szybko zdjęcie. Tym, czego nie będziemy zmieniać są kolczyki (temat zdjęcia).

Krok 1
Popraw niedoskonałości skóry wybierając z paska narzędzi Spot Healing Brush Tool.

Krok 2
Wybierz filtr Liquify by zmienić kształt twarzy, powiększyć oczy, czy w naszym przypadku: zmienić przebieg ręki. Każdorazowo zmieniaj wielkość pędzla, by edytować tylko to, co jest konieczne.


Krok 3
Wykadruj obraz, by niepotrzebnie nie zajmować się obciętym później kawałkiem zdjęcia. Użyj do tego narzędzia Crop Tool . Jeśli chcesz, by obraz był kwadratem, to przytrzymaj Shift w trakcie wykonywania operacji.


Krok 4
Utwórz nową warstwę, by bezpieczniej poruszać się wśród zmian i w razie czego szybko je anulować. Layer > New > Layer.


Krok 5
Użyj narzędzia Brush by podrysować zdjęcie. Klikając na zdjęciu prawym przyciskiem wybierz rodzaj i rozmiar pędzla. Kolory będą prawdziwe tylko, jeśli użyjesz tych, które już na nim są. Klikamy lewym przyciskiem myszy na pożądany kolor, jednocześnie trzymając Alt, by go pobrać. W ten sposób uzyskujemy dłuższe rzęsy, czerwieńsze usta, …


Krok 6
Kolejny raz zabezpieczamy się przed możliwymi nieodwracalnymi zmianami. Kopiujemy nasze wyjściowe zdjęcie na dodatkową warstwę, by móc w każdej chwili porównać je z późniejszą wersją.
Zaznaczamy warstwę Tła i wybieramy z menu Layer > Duplicate Layer.


Krok 7
Szukamy na dysku zdjęcia, którego fragment nadaje się nam na tło. Otwieramy je w programie, kopiujemy i wklejamy jako nowa warstwa naszego zdjęcia. Jeśli zaznaczyliśmy Show Transform Controls, to rozciągamy je do pożądanych rozmiarów.


Krok 8
Zmieniamy kolejność warstw: nowe tło przesuwamy pod zdjęcie. Następnie zaznaczamy warstwę ze zdjęciem i przy pomocy gumki usuwamy miejsca z niechcianym tłem. Gumka powinna mieć rozmyte krawędzie, by granica między tłem a pierwszym planem nie była wyraźna.


Krok 9
Przy pomocy czarnego pędzla o rozmytych krawędziach i tylko kilku procentach jego Nieprzezroczystości (Opacity) podmalowujemy przestrzeń styku planów. Lepiej ustawić mniejszy procent i nałożyć cień kilka razy. Tą operację przeprowadzamy na kolejnej warstwie znajdującej się między tłem a pierwszym planem.


Krok 10
Używając narzędzia Burn wyostrzamy kolory i przyciemniamy miejsca styków planów. Warto wypróbować wszystkie trzy możliwości tego narzędzia wybierając je z menu u góry (m.in. Midtones).


Krok 11
Jeśli tło i pierwszy plan nadal wyglądają, jak zlepek dwóch różnych zdjęć, użyj do wybranej warstwy któregoś z narzędzi z Image > Adjustments i zdecyduj, które lepiej się sprawdziło (np. Levels, Curves). Wyrównaj w ten sposób kontrast między nimi.


Krok 12
Spłaszcz warstwy (Layer > Flattern Image). Jeśli dalej nie jesteś zadowolony z efektu spróbuj funkcji: Image > Auto Kontrast, Image > Auto Color, Image > Auto Tone (w takiej kolejności).
Na koniec dostosuj wielkość zdjęcia do np. 700 pikseli: Image > Image Size.


Tuesday, November 23, 2010

HOW TO paint a watercolor portrait


To paint a portrait, first you will need to choose your subject. You can use a "real person" which is a wonderful way of doing it or you can choose any picture. I usually go with pictures. This gives me more flexibility as far as time plus it's a little hard to keep the children still. For this demonstration I chose a picture of my sister and I that was taken about 25 years ago.
You will need the following supplies: paper (I always choose Arches, it's well worth to spend extra on a better paper), brush or several brushes (here I'm going to work with 2 brushes, size 10  & 4), paints (I use Cotman tubes) & palette for your paints, a pencil and a jar of water.
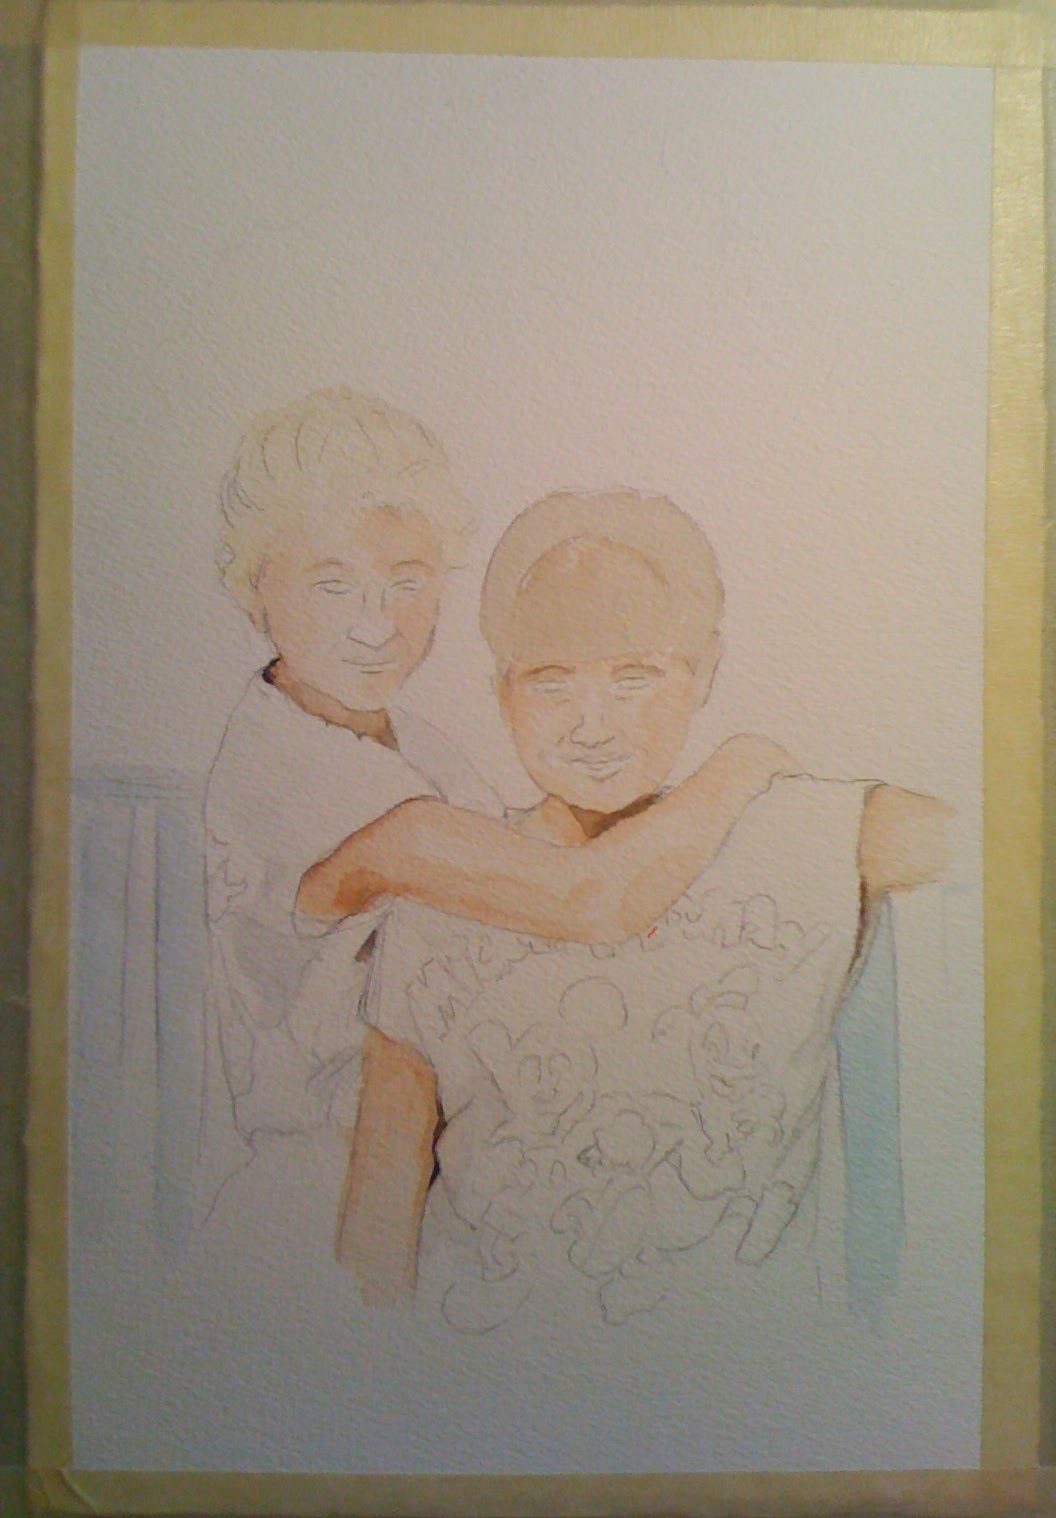
I always start with a quick outline sketch. You can choose to use tracing paper or a light box if you have problems with proportions. Here, I decided not to follow the picture exactly but paint a more close up version of it. After, I've finished with the sketch, I apply first layers of color, I use a lot of water in this faze.


Then, I start with details. You can see it on the 2nd picture - how I've added some shading to the skin and the shirts. I also continue with adding more color everywhere else - here I've started on the railing.

From then on,  I continue adding  more and more details which you can see on the following 2 pictures:


First, I continued adding more skin tone / shading, more details on the shirt and railings. Later I've added background, more details on the girls and most importantly, I've started with the eyes. Eyes really give life to the  face and you can see the faces become alive in the picture on the right.

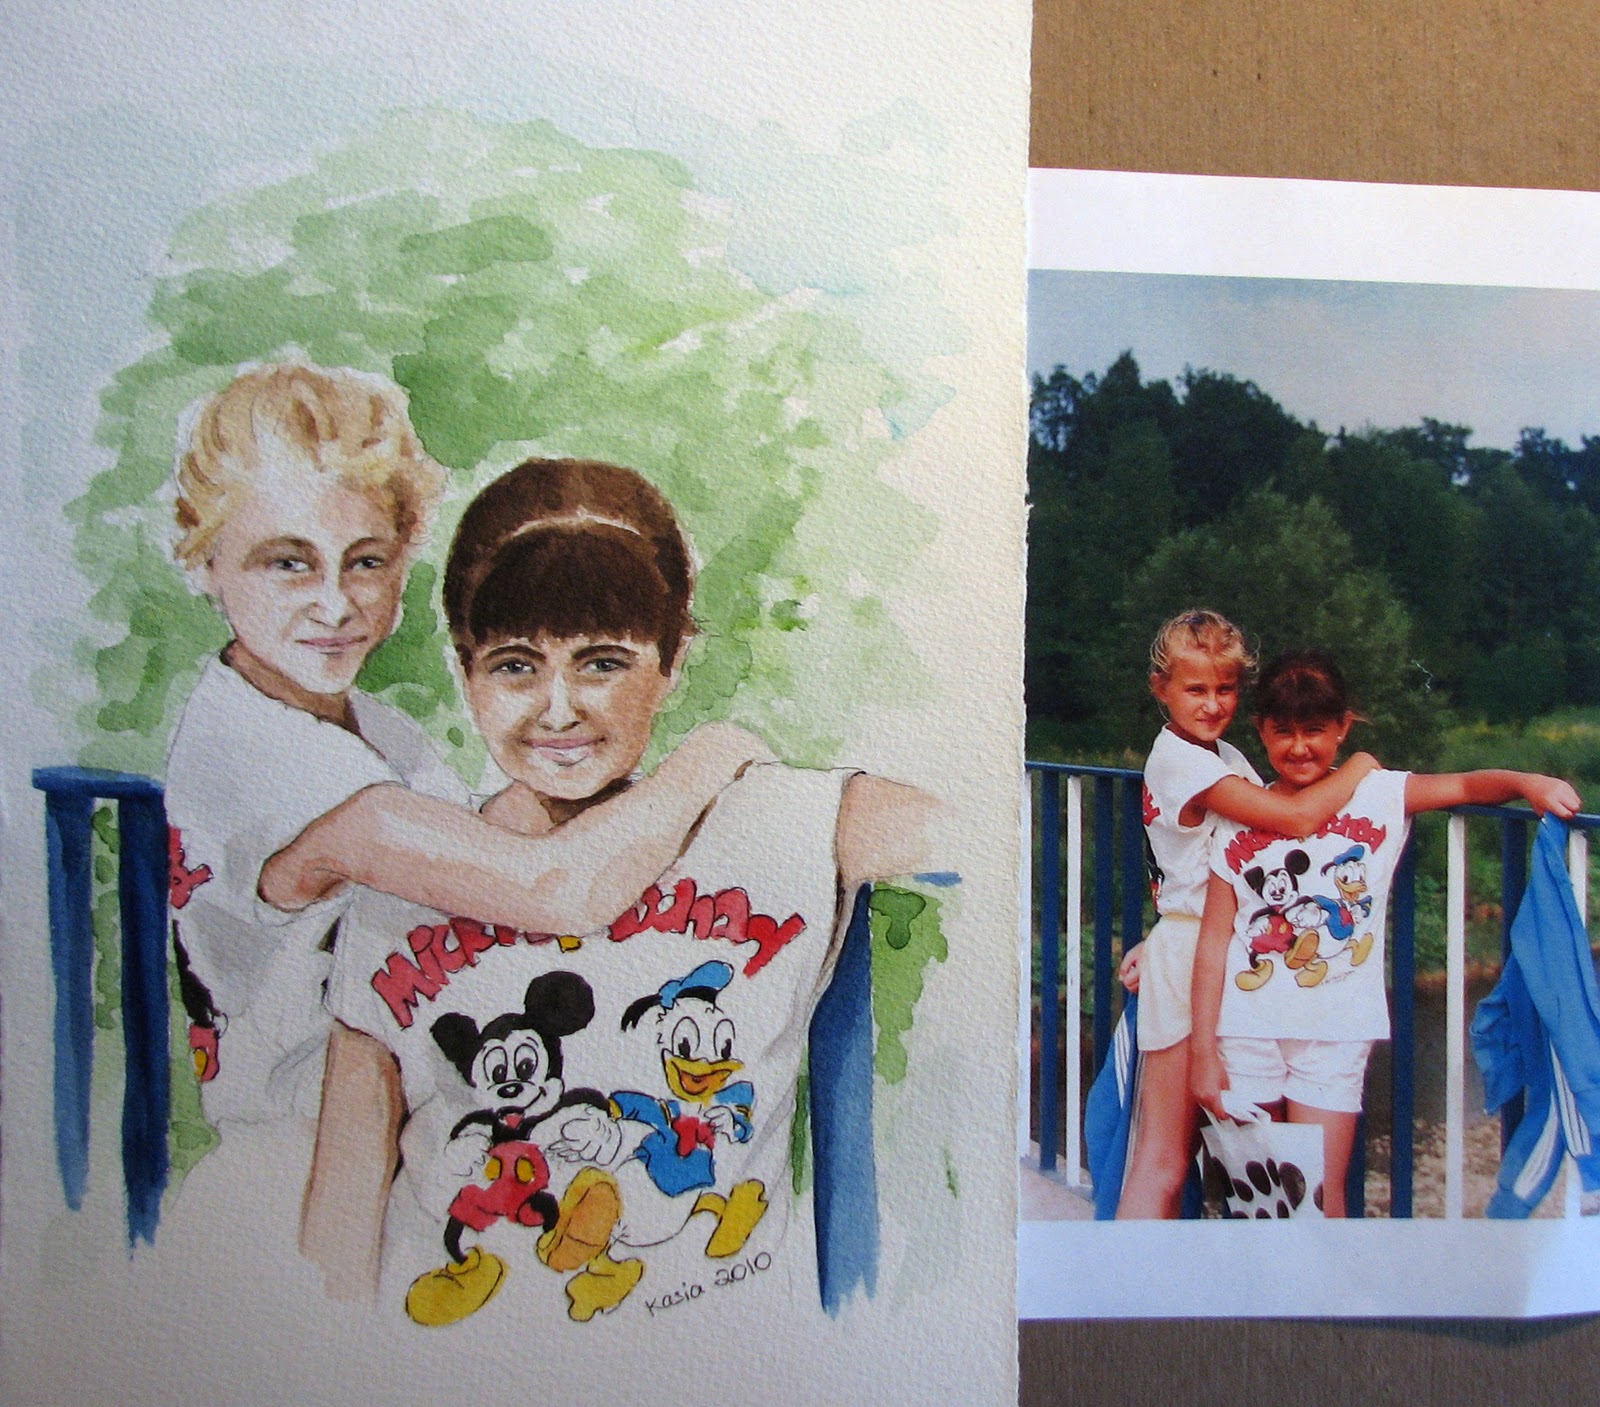
From then on it's a little more details here and there until I'm finished. It's hard to make yourself stop because there are always little spots that don't look perfect, but at the same time, you don't want the picture to look overworked. Below is the finished product:


If I was to give an advice to anybody who's trying to paint or draw, I'd have to quote one of my teachers, Chris Dorman, who always said: "Paint what you see, not what you know". For example you know that the railroad tracks never meet, but they might meet on the horizon of your painting because that's how you see them. 

Below is the portrait next to the original picture. This way you can compare and critique the two: 

If you would like to learn more about my art  please visit my blog: www.feelingartsy.blogspot.com 
Thank you Poletsy for having me share some of my "secrets" with you!
Kasia Blanchard


Tuesday, November 16, 2010

Basic Photo Editing with GIMP

GIMP is a freeware program you can use to edit photos. You can download it HERE
This is a tutorial I made for my polish friends from POLetsy. We will translate it into english as soon as possible.

Podstawowa obsługa GIMPa jest bardzo prosta, od 4 lat używam tego darmowego programu do edycji zdjęć mojej biżuterii. Program posiada wiele ciekawych opcji i narzędzi, jednak tutaj ograniczę się do przedstawienia podstawowych przydatnych elementów do edycji zdjęć. 
Na początku chciałabym wyczulić wszystkich na coś, o czym zdarza się zapominać - zdjęcie musi być dobrze wykonane, nie może być zupełnie rozmazane, z latającymi pikselami i szumem. I nie chodzi tu o możliwości programu, tylko o odzwierciedlenie rzeczywistego przedmiotu, który chcemy pokazać innym.

A więc, zacznijmy :)

Krok 1 to zrobienie zdjęcia. Pamiętaj, że nie sprzęt jest najważniejszy, ale umiejętność jego obsługi. Robiąc zdjęcie zadbaj o to, żeby światło było dobrze rozproszone (najlepiej naturalne), możesz użyć białych kartek różnej grubości, które będą odbijać i rozpraszać światło. Unikaj fleszy! 

Krok 2. Otwórz zdjęcie w GIMPie. Na moim zdjęciu widać ciemne plamy i cienie. Zanim wstawię je do galerii, muszę je tak zmodyfikować, żeby nie zakłamać kolorów przedmiotu, jednocześnie usuwając brzydkie szarzyzny ze zdjęcia. 
Na początku delikatnie poprawię kontrast. W tym celu używam opcji Kolory > Jasność i kontrast


Rzadko ustawiam suwak kontrastu na liczbę większą niż 5, najczęściej jest to 3. Jest to, moim zdaniem, optymalna wielkość, która zbytnio nie ingeruje w zdjęcie, ale przyda się w późniejszej edycji tego zdjęcia. Suwak jasności pozostawiam bez zmian.


Krok 3. Moim ulubionym narzędziem w GIMPie są Kolory > Poziomy. Dzięki nim pozbywam się szarego lub zaniebieszczonego tła bez ingerencji w kolorystykę przedmiotu.


W tym celu można użyć suwaka pod czarnym diagramem (i przesuwać go w lewo/prawo aż do uzyskania pożądanego efektu), ale ja używam pierwszej od prawej "pipetki", która dopasowuje poziomy automatycznie w zależności od koloru, na który się nią kliknie. Po zaznaczeniu narzędzia, kliknij "pipetką" w szare plamy na zdjęciu, najlepiej te znajdujące się najbliżej przedmiotu. Program usunie szarzyznę, która odpowiada tonom koloru klikniętego miejsca.
Nie musisz usuwać plam z całego zdjęcia! Zdjęcie będziemy jeszcze kadrować, a poza tym - te plamy, które nie stykają się z przedmiotem, łatwo można usunąć "gumką". Jest to prostsze, niż manewrowanie poziomami.


Krok 4. Niektóre galerie wymagają, żeby zdjęcia posiadały konkretne proporcje, najczęściej kwadratowe. W tym celu używam narzędzia Obraz > Wymiary obrazu. Pojawi się okienko, w którym można ustawić szerokość i wysokość, zaznaczyć część zdjęcia, dla której takie ustawienia należy zastosować i "Zastosuj".


Jeśli nie musisz dostosowywać zdjęcia do konkretnych proporcji, użyj prostego narzędzia kadrowania (na pasku programu widnieje jako prostokąt, pierwszy od góry), zaznacz obszar, który chcesz zachować i kliknij Obraz > Kadruj według zaznaczenia.


Krok 5. Po wykadrowaniu obraz wciąż jest w dużym oryginalnym rozmiarze. Większość galerii posiada limity dla  wielkości wgrywanych zdjęć, dlatego należy je zmniejszyć. W tym celu użyj Obraz > Skaluj Obraz. W okienku należy wpisać maksymalną szerokość (lub wysokość), a drugi parametr dostosuje się sam. Ja zmniejszam zdjęcia do 700px, ponieważ klient po kliknięciu w zdjęcie ogląda go na pełnym monitorze. Większe zdjęcia najczęściej trzeba wtedy przewijać, a mniejsze - wpatrywać się usilnie w szczegóły. Nie ingeruję w dpi (chociaż można samemu ustawić większe).


Krok 6. Na takim zmniejszonym zdjęciu można teraz trochę poprawić wyrazistość przez Filtry > Uwydatnianie > Wyostrzanie. W okienku ustawiasz wartość wyostrzania (osobiście zalecam nie przekraczać wartości 40 - przy większych wartościach na zdjęciu pojawią się piksele)


Krok 7. Ostatnim moim krokiem przy edycji zdjęcia jest "zblurowanie" niektórych jego miejsc. Narzędziem w postaci graficznej kropelki (rozmazywanie/wyostrzanie selektywne) rozmazuję lekko kontury ekspozytura. Dzięki temu, na pierwszy plan wysuwa się sam przedmiot, a ekspozytor zostaje w tle, nie rażąc oczu mocno odcinającymi się konturami. 


Końcowy efekt mojego edytowanego zdjęcia przedstawia się tak:


Można, oczywiście, dodatkowo usunąć cienie z dołu, jednak osobiście jestem zwolennikiem naturalnych cieni, nie przeszkadzających w widzeniu przedmiotu. 

Jestem świadoma, że przedstawione kroki i narzędzia są do bólu podstawowe, ale w przypadku osób, które wolą więcej uwagi poświęcić pracy twórczej, niż ślęczeniu przed komputerem, jest to proste rozwiązanie: szybka edycja, dająca dobre efekty. W przypadku jakichkolwiek pytań, proszę o zadawanie ich w komentarzach pod tym postem lub na naszym forum POLetsy

Tuesday, October 19, 2010

HOW TO make a print screen of your Treasury?

Etsy Treasury is one of most popular Etsy promotion tool. Make sure that your treasury can be seen not only by Etsians, but also by your blog visitors or Facebook fans. This short "how-to" tutorial is made by POLetsy member AnnaWoz. You will learn how to make "photo" of your treasury to place it wherever you want!

1, Open treasury you want to save. Reduce view by clicking CTRL and '-' (minus) at the same time.
When all 4 coulmns of treasury are on your screen, click "Prt Scr". 
2. In next step you can use every graphic software you have. I use Paint. 

Open Paint and and "paste" your print screen into it. Now click on little rectangular (dotted line) on left side. Your cursor will look like a cross.


Select the area youd like to save. 


And then:
a) in some Paint versions: click "Image" (in upper menu) and "Crop";
b) in others: click on selected area and drag it into the left corner.


If your 'crop' tool doesn't work and you dragged selected area into left upper corner, now you must find little dots. These dots are outside the pasted area (on the right side and down the picture).


Your cursor will be double-sided arrow. Click-and-drag this dot. Reduce the area. 


3. To save your treasury, click "File" (in upper menu) and "save as". Write name of treasury in and save as type "jpg". 

Now you can place this photo on your blog or Facebook!

Related Posts Plugin for WordPress, Blogger...

Last Month popular posts